Introduction
This article explains how to configure a Microsoft SQL Database Monitor in Monitoring Studio X v10.4+ using Windows/Active-Directory-integrated Authentication.
For this setup:
- SQL Server authentication is automatically managed by Microsoft’s JDBC driver.
- The PATROL Agent’s default account is used to connect to the database, meaning no additional credentials are required for the monitored MS SQL Server within the Monitoring Studio X template. Therefore, no credentials should be entered in the Host configuration.
Prerequisites
Make sure that:
- Monitoring Studio X v10.4+ is installed and the following .dll files are present in the %PATROL_HOME%\bin directory:
C:\BMCSoftware\Patrol3\bin>echo %PATROL_HOME%
C:\BMCSoftware\Patrol3\

C:\BMCSoftware\Patrol3\bin>dir/w  mssql-jdbc_auth*.dll
 Volume in drive C is Windows
 Volume Serial Number is 0C1C-47AB

 Directory of C:\BMCSoftware\Patrol3\bin

mssql-jdbc_auth-9.2.1.x64.dll   mssql-jdbc_auth-9.2.1.x86.dll
               2 File(s)        574,480 bytes
               0 Dir(s)  187,651,960,832 bytes free
-
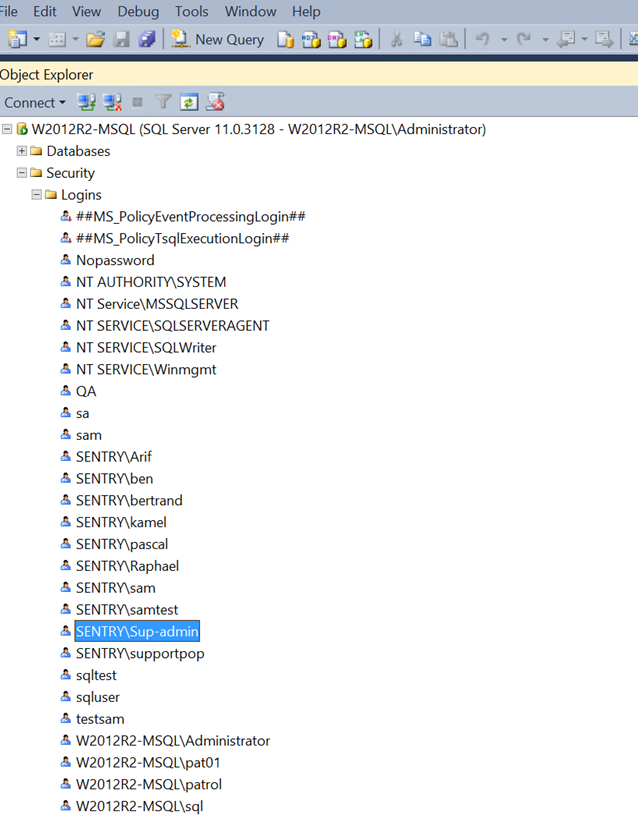
The Windows/AD account:
-
has the right to access the Microsoft SQL database:
-
belongs to the Local Administrators group on the system where the PATROL Agent is installed
-
is specified as the “Default Account” for the PATROL Agent.
-
Step 1: Setting the PATROL Agent’s Default Credentials
To execute the query, Monitoring Studio X uses the PATROL Agent’s default credentials, which can be configured through the /AgentSetup/defaultAccount configuration variable. This variable should be set to the appropriate Windows/Active Directory (AD) account for authentication.
You can use the pconfig/wpconfig tools to set this configuration variable as illustrated below:
    pconfig +get -host helix-agent2 | findstr /i defaultAccount

    "/AgentSetup/defaultAccount" = { REPLACE = "SENTRY\\sup-admin/$-4$-$FC1544E9D095709ECAAEBEA1E2649D791986257C86973B48FC2345B15A91CABCF1E6A61F2BAD158BFF737DD03C24" },
Step 2: Configuring your monitoring template
- Access the Monitoring Studio X Web interface at
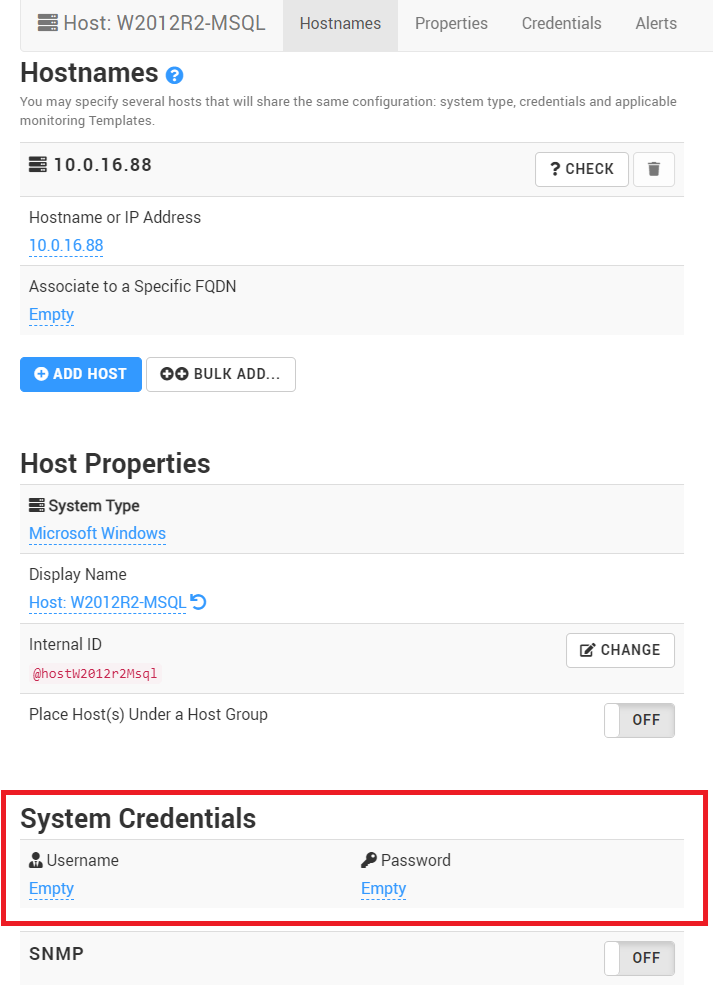
https://<agentHostname>:3443 - Define the host on which the Microsoft SQL Database to be monitored is installed. Leave the system credentials empty.
- Define your monitoring template:
- Provide the template general information
- Select Microsoft SQL Server as the Database Type and click Create
- Add the Database Query Monitor, provide the required information as explained in the User Documentation and click Create.
- Select the host you previously created, associate the required Microsoft SQL monitoring template, and click Save.
Step 3: Validating your monitoring template
From the Monitoring Studio X Web Interface
- Access the Database Query Monitor you previously created
- Perform a Dry Run against your host:
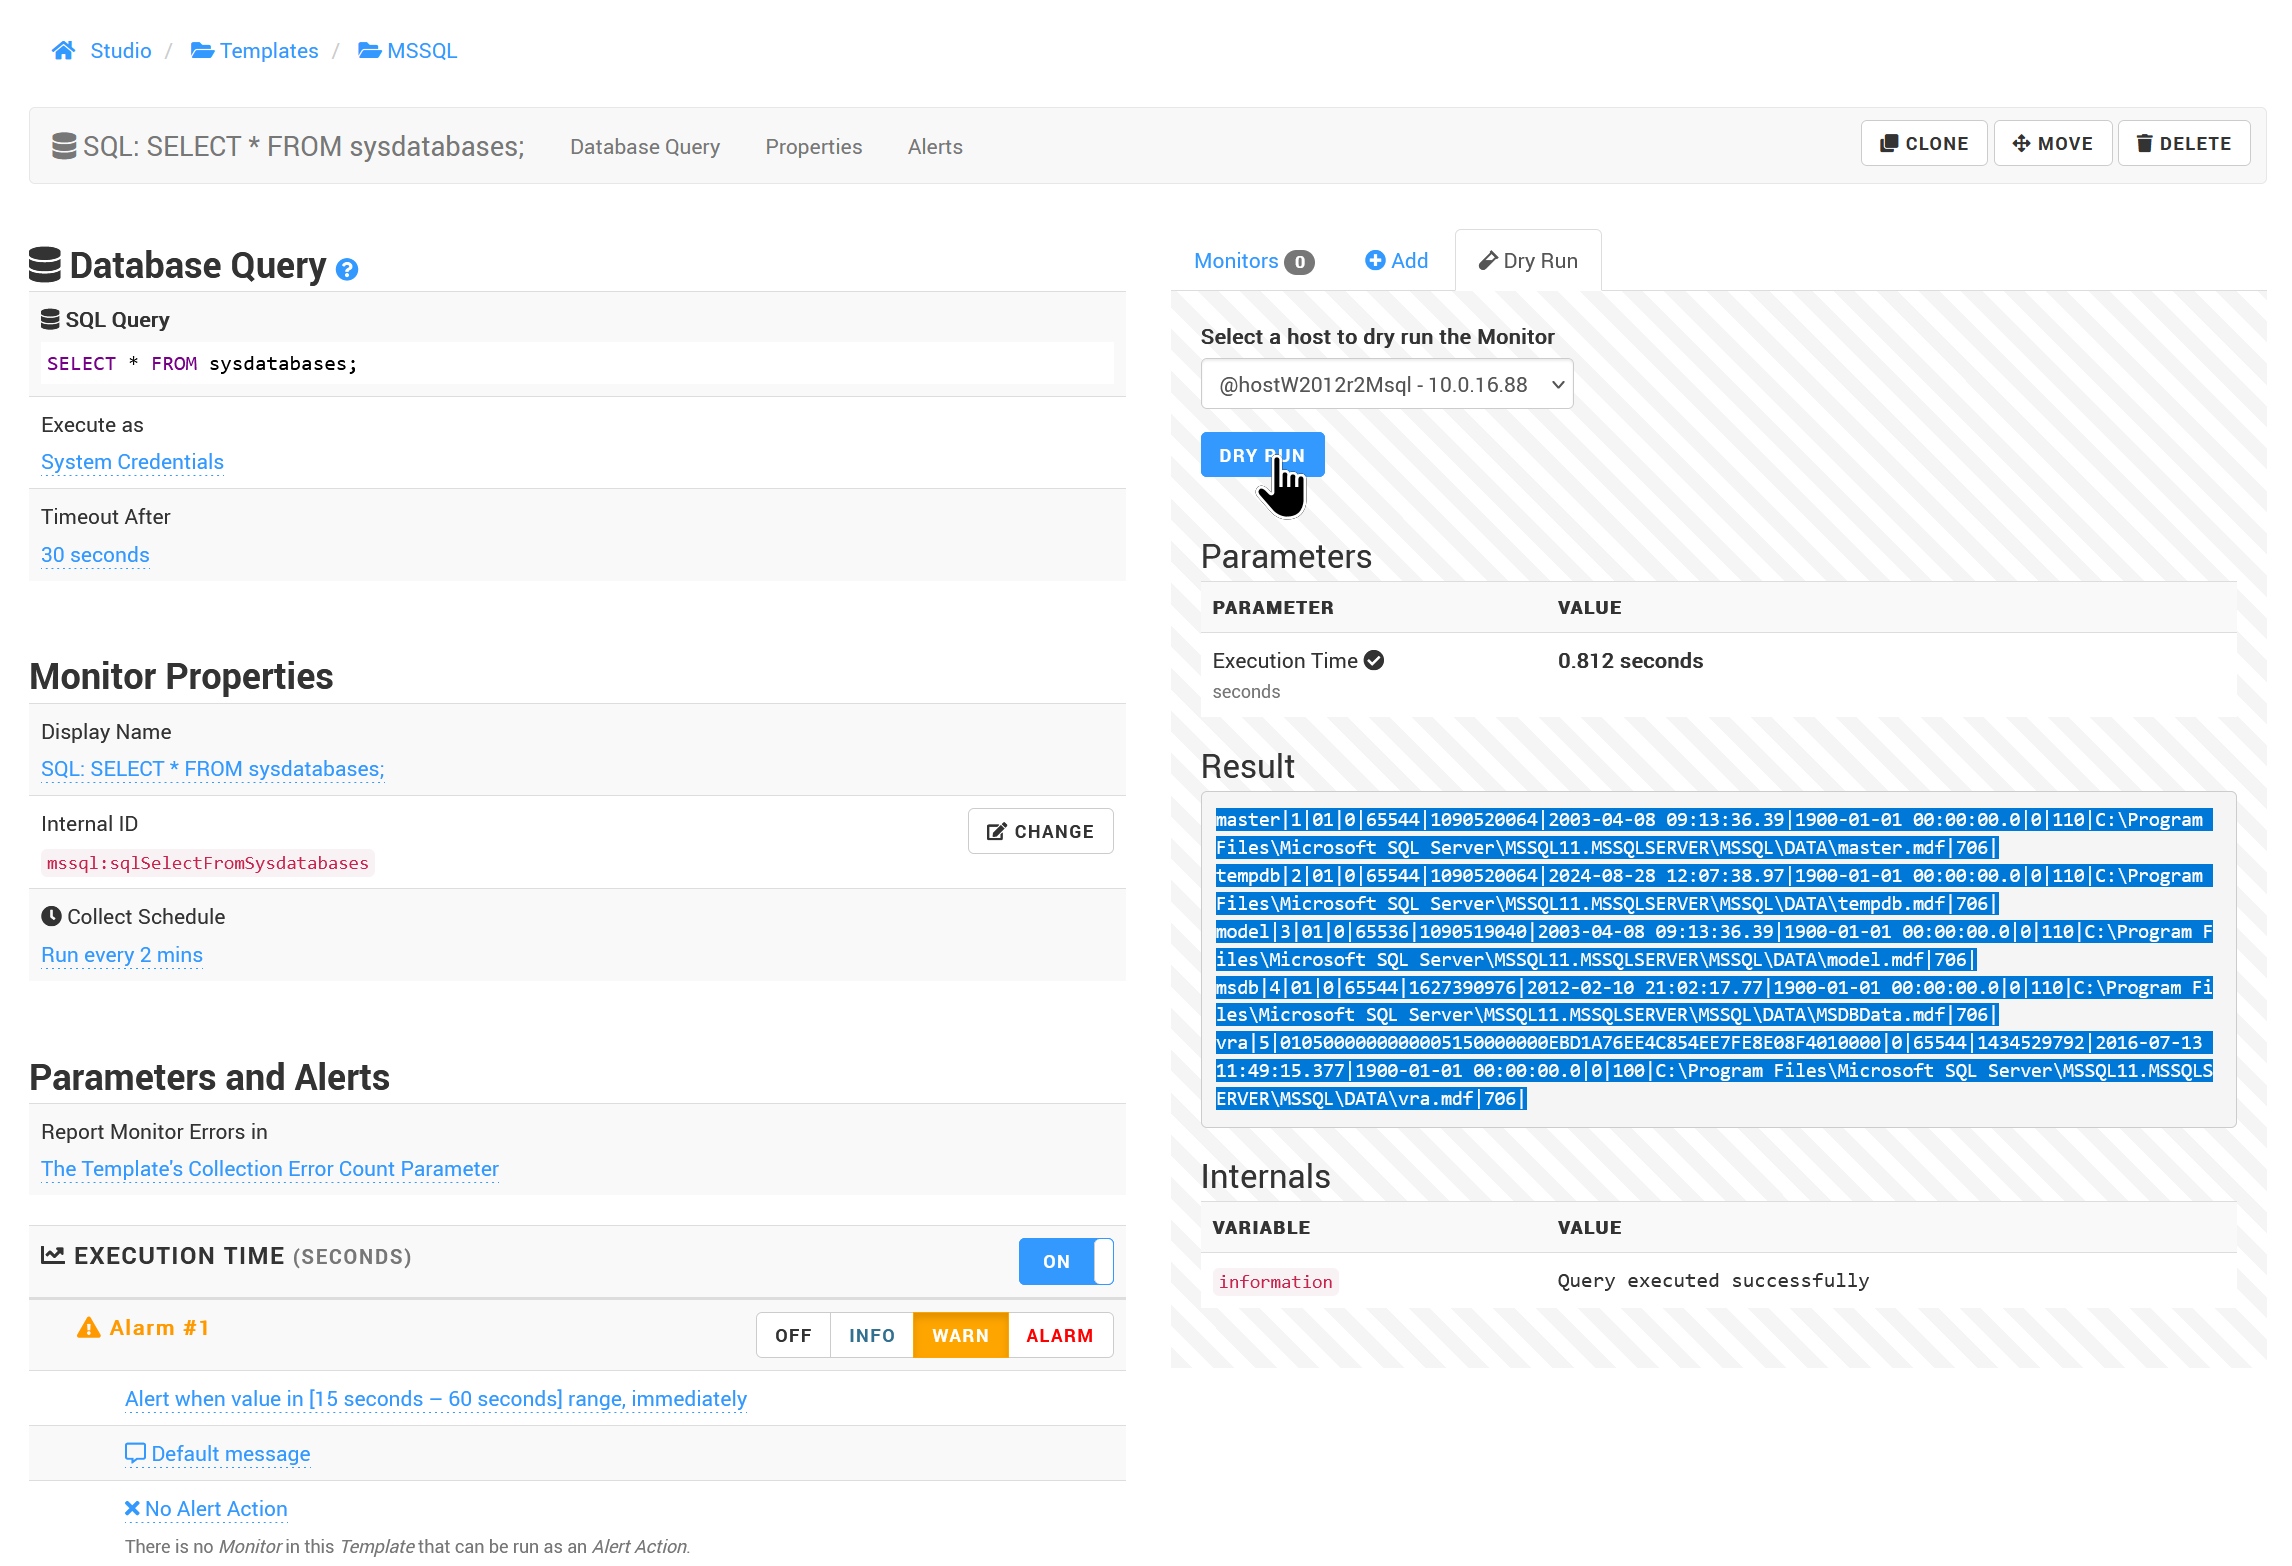
- Verify that the query is successful.
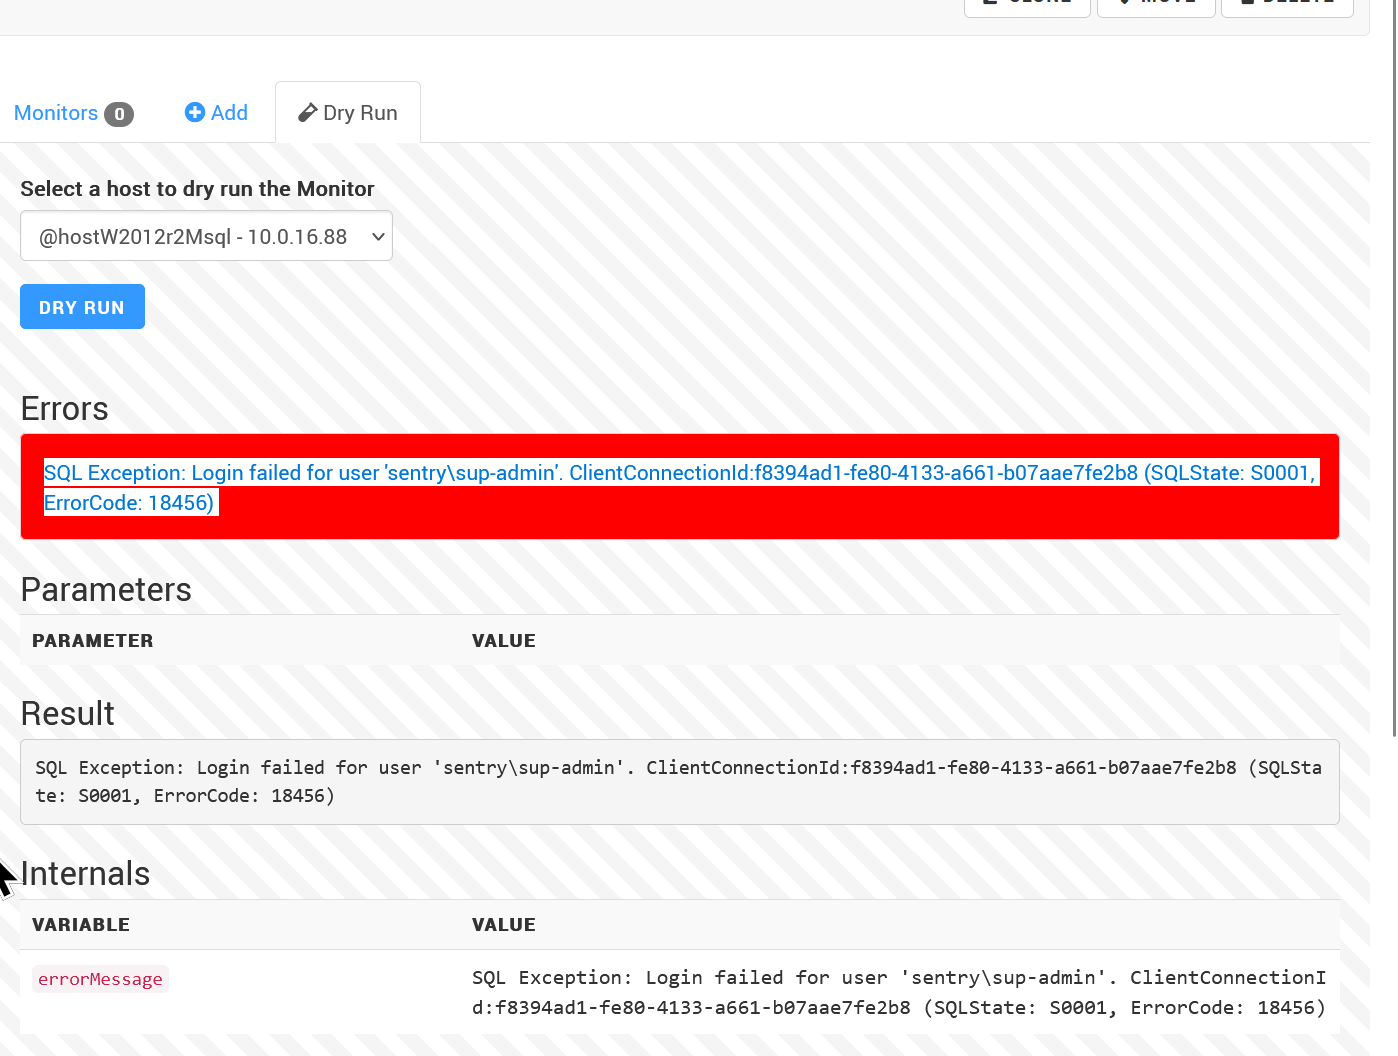
If the following error occurs, edit the host configuration and leave the system credentials empty:
Using the KM’s JDBC client
On the PATROL Agent Windows machine, log in using the defaultAccount (in this example, SENTRY\sup-admin):
C:\BMCSOF~1\Patrol3\bin>whoami
sentry\sup-admin

C:\BMCSOF~1\Patrol3\bin>java -jar X_matsya-module-jdbc.jar jdbc:sqlserver://10.0.16.88:1433;databaseName=master;integratedSecurity=true "SELECT * FROM sysdatabases"
Sep 03, 2024 9:45:06 AM com.microsoft.sqlserver.jdbc.TDSChannel enableSSL
WARNING: TLSv1 was negotiated. Please update server and client to use TLSv1.2 at minimum.
master;1;01;0;65544;1090520064;2003-04-08 09:13:36.39;1900-01-01 00:00:00.0;0;110;C:\Program Files\Microsoft SQL Server\MSSQL11.MSSQLSERVER\MSSQL\DATA\master.mdf;706;
tempdb;2;01;0;65544;1090520064;2024-08-28 12:07:38.97;1900-01-01 00:00:00.0;0;110;C:\Program Files\Microsoft SQL Server\MSSQL11.MSSQLSERVER\MSSQL\DATA\tempdb.mdf;706;
model;3;01;0;65536;1090519040;2003-04-08 09:13:36.39;1900-01-01 00:00:00.0;0;110;C:\Program Files\Microsoft SQL Server\MSSQL11.MSSQLSERVER\MSSQL\DATA\model.mdf;706;
msdb;4;01;0;65544;1627390976;2012-02-10 21:02:17.77;1900-01-01 00:00:00.0;0;110;C:\Program Files\Microsoft SQL Server\MSSQL11.MSSQLSERVER\MSSQL\DATA\MSDBData.mdf;706;
vra;5;0105000000000005150000000EBD1A76EE4C854EE7FE8E08F4010000;0;65544;1434529792;2016-07-13 11:49:15.377;1900-01-01 00:00:00.0;0;100;C:\Program Files\Microsoft SQL Server\MSSQL11.MSSQLSERVER\MSSQL\DATA\vra.mdf;706;
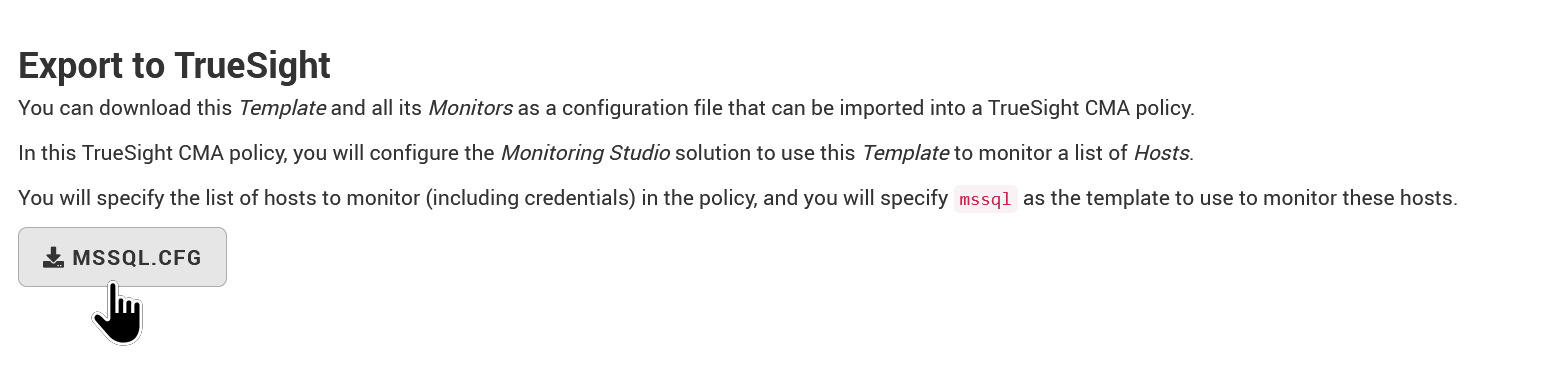
Step 4: Exporting your monitoring template
When you successfully complete step 3, export the monitoring template as described in the user documentation. Take note of the template ID (in our example, mssql) as you will need it later while configuring the BMC Helix policy.
Step 5: Configuring the BMC Helix Policy
-
Log in to Helix Operations Management
-
Create a new monitoring policy:
- Specify the general properties and agent selection criteria
- Add a monitoring configuration
- Select the Monitoring Studio X solution and Version 10.4.00 or higher

-
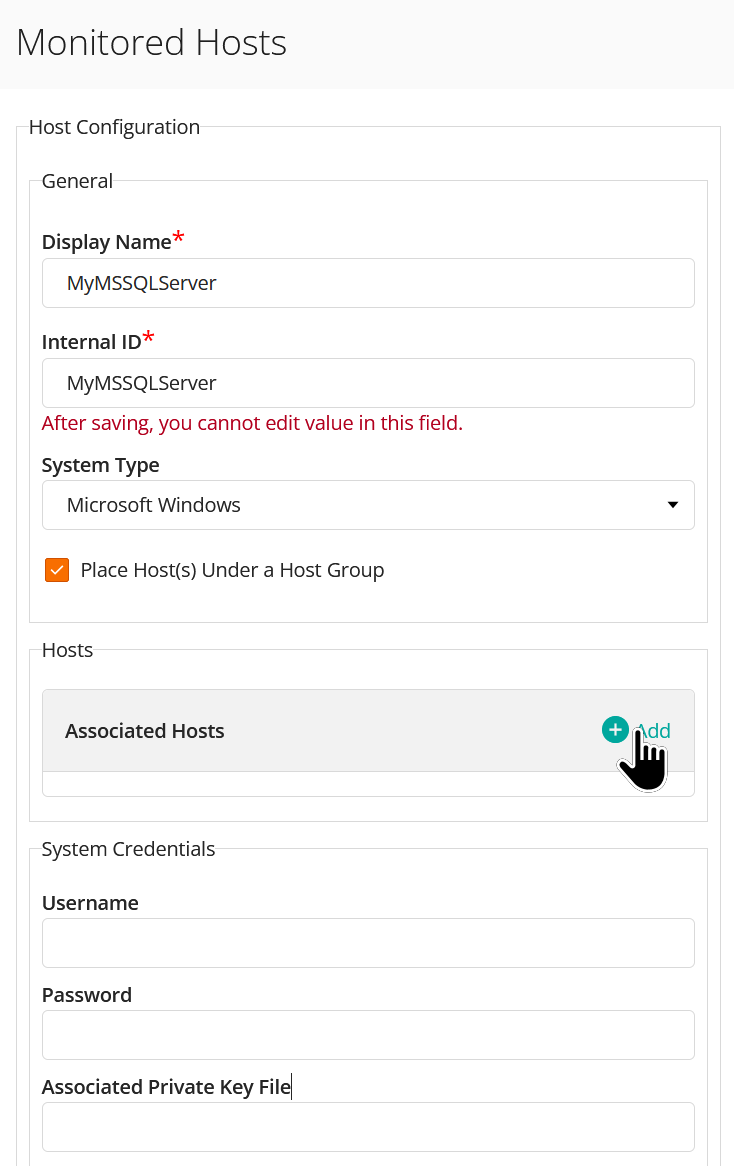
In the Monitoring Studio Configuration section, click Add to create a new monitored host.
-
Provide the host general information. Make sure to leave the System Credentials blank
-
In the Host section, click Add to configure associated hosts (MS SQL Server):
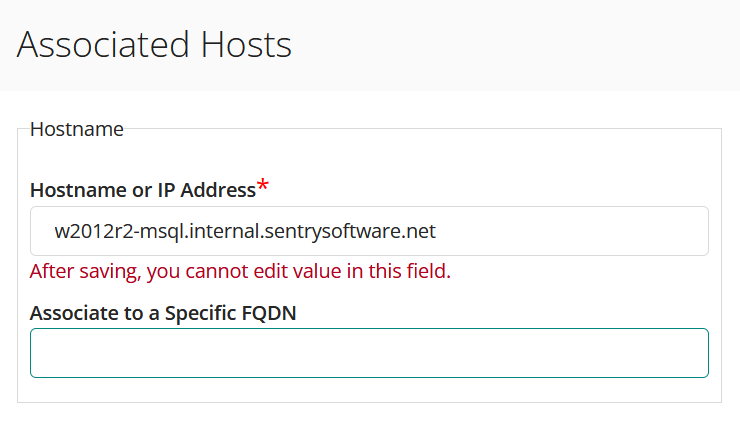
- Provide the hostname/IP address of your MS SQL Server
- Click OK.
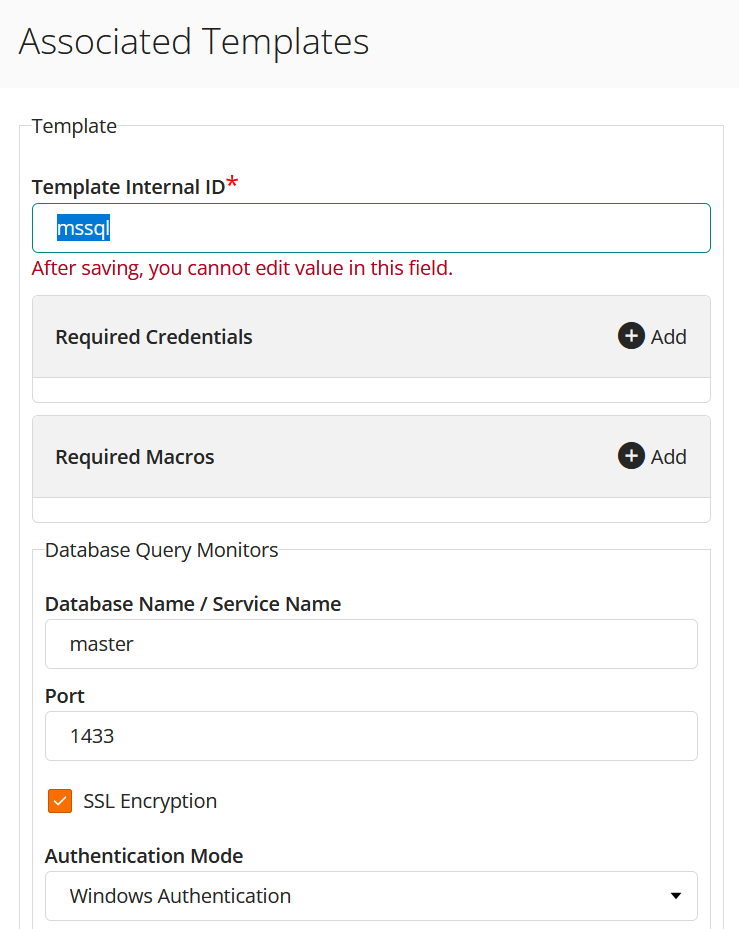
- Scroll down to the Templates section and click Add:

-
Associate the template you previously exported from the Monitoring Studio X Web Console:
- Specify the Template Internal ID, Database Name/Service Name, and Port
- Set the Authentication Mode to Windows Authentication.
- Leave the Username and Password fields blank.
-
Review the information:

-
If everything is correct, click OK and Close
-
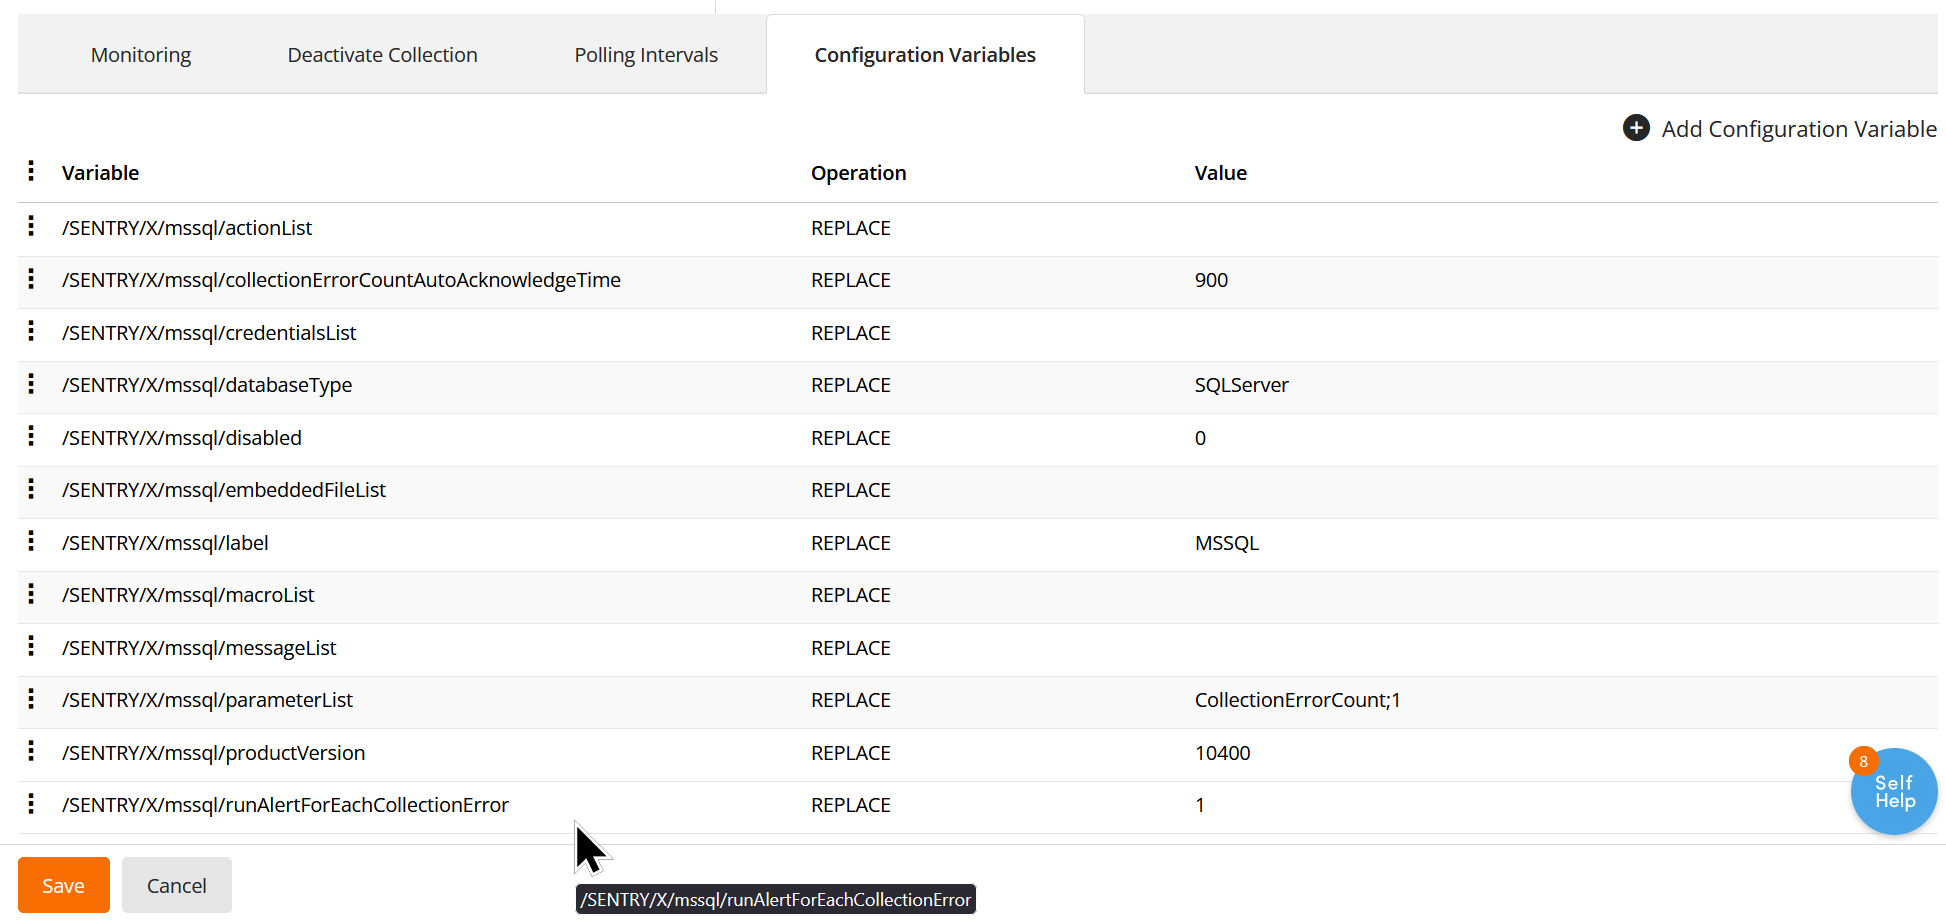
Go to the Configuration Variables tab and click Import to add the template you previously exported via the Monitoring Studio X Web console.

After a successful import, all configuration variables should be displayed as shown below:
-
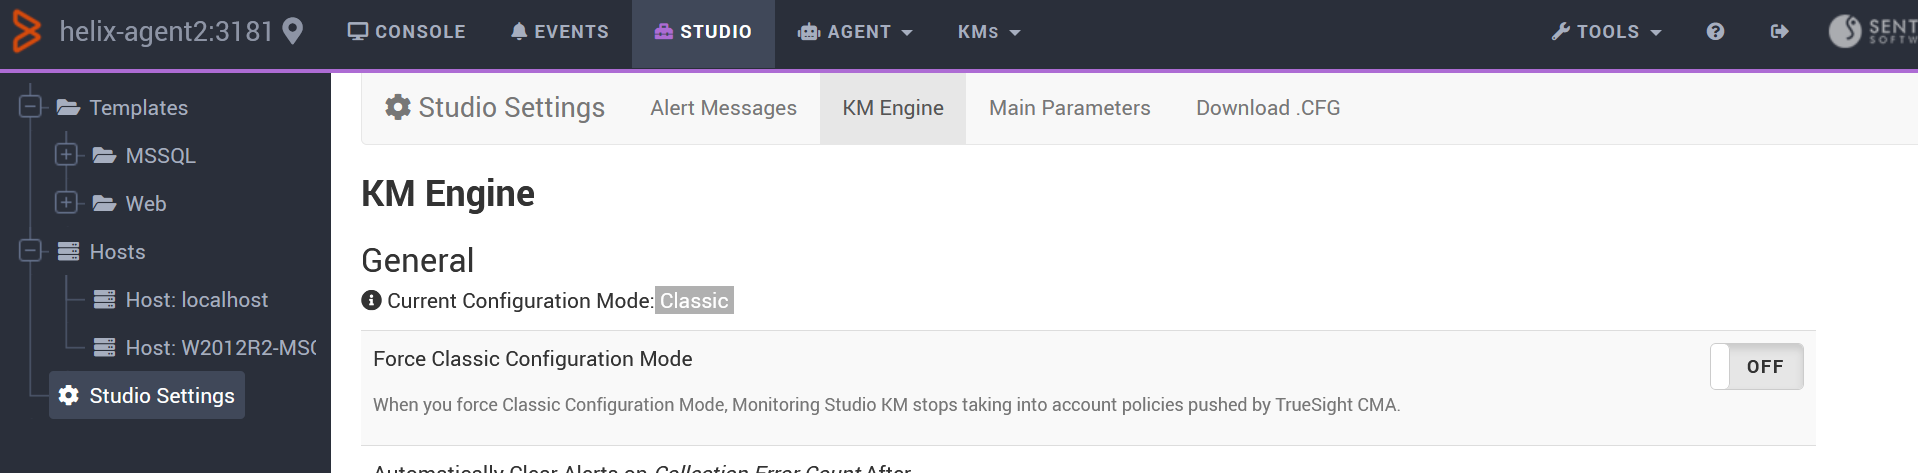
If this policy applies to the same PATROL Agent on which the template was created, switch the KM to CMA mode as explained below:
- From the Monitoring Studio X Web Console, go to STUDIO>Studio Settings>KM Engine.
- Make sure Force Classic Configuration Mode is switched off
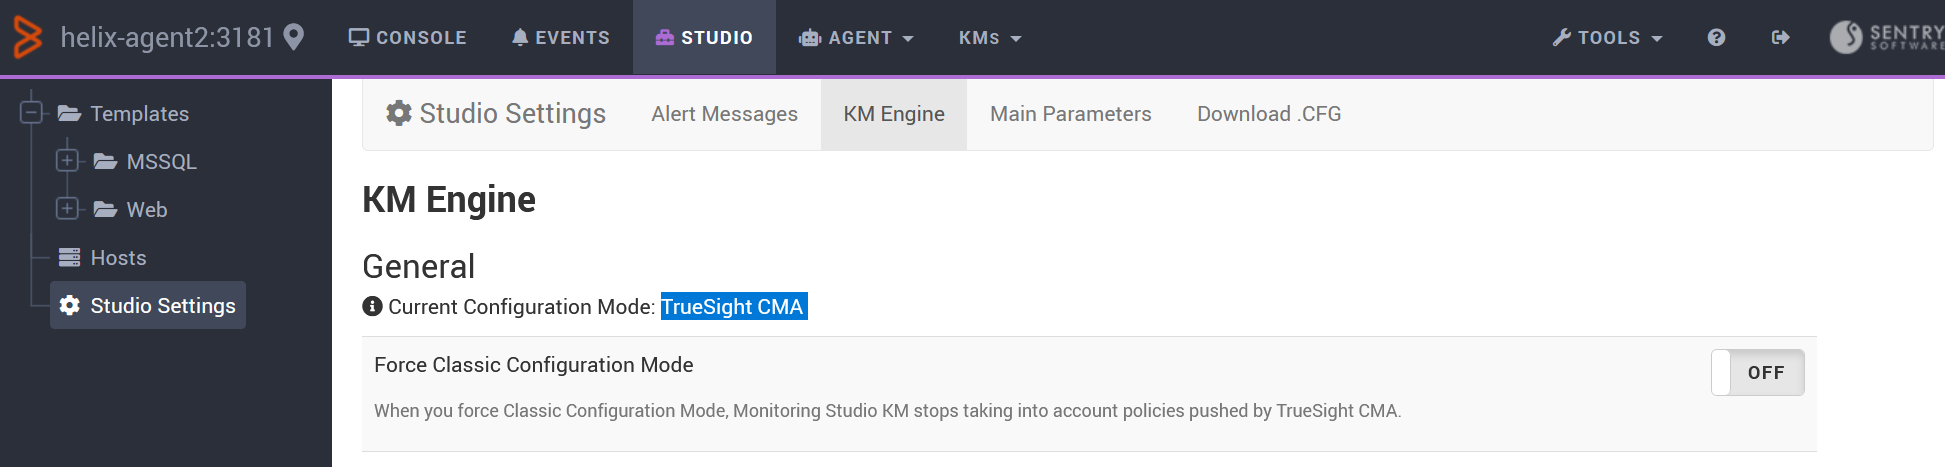
- Restart the PATROL Agent.
- Check that KM is now in TrueSight CMA mode:
-
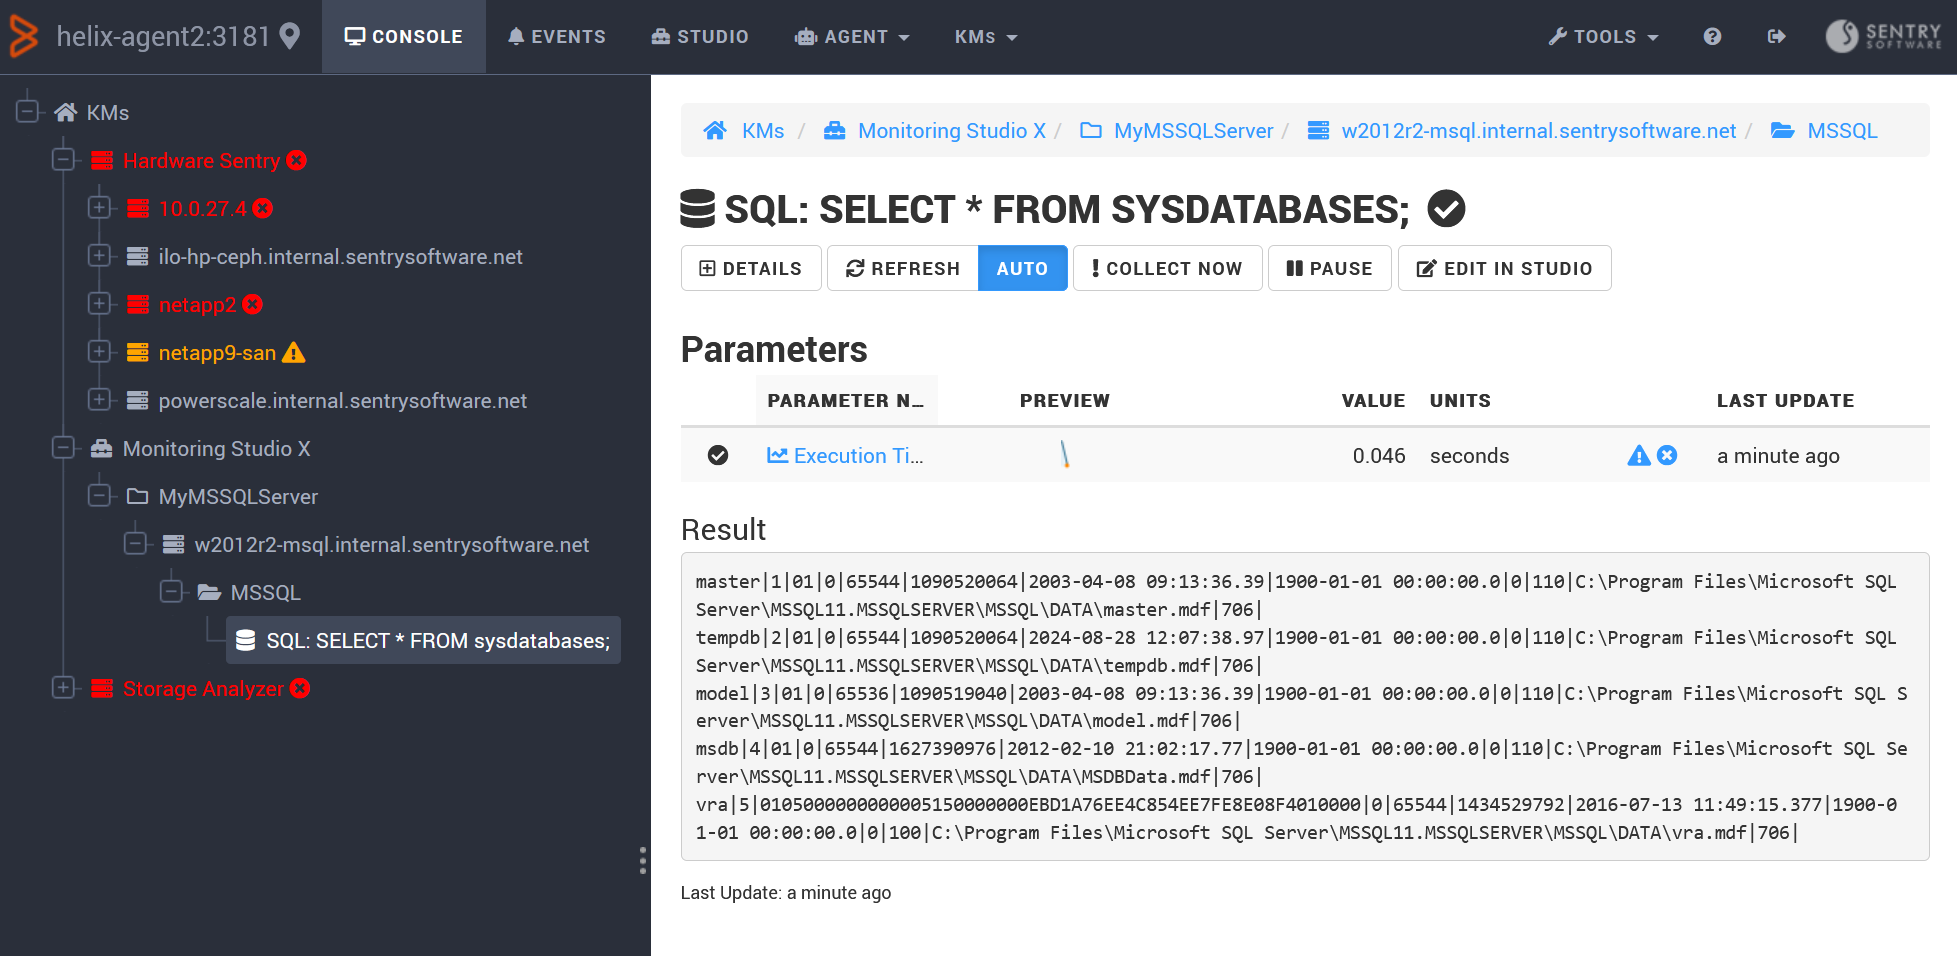
Open the Console to make sure the policy has been applied and is working fine:
Related Topics
- Monitoring Microsoft SQL Server with Monitoring Studio 9.4.xx
- How to display the HTTP Status parameter in Monitoring Studio X
- Identifying and Locating Storage Devices in BMC Helix Operations Management
- How to Migrate Monitoring Studio X Policies from TrueSight to Helix Operations Management
- Monitoring Studio X: HTTP Proxy Authentication Fails When Using Java 8 Update 111 or Later